Monday, November 4, 2013

Amethyst Bracelet and Dangle Earrings

Gemstones, whether we wear our birth stone or use them for healing, are magnificent to have around in any environment: office, home, outdoors. Used in jewelry, it can symbolize the wearer's birth month or is believed by many to contain certain healing properties. Amethyst, the stone for February, is believed to invoke healing and purify negative energy. Its calming properties help clear the mind and are often used in meditation. Even though my birth stone is not amethyst, I absolutely adore this gem!

I was happy to get my hands on some lovely amethyst chips, and excited to use them in creating comfortable pieces of jewelry that are wearable for various occasions. 

The bracelet is made of amethyst chips, and a crystal purple bead in the center. It closes with a simple toggle and clasp. The bracelet measures approximately 7 1/4 inches from toggle to clasp.

Amethyst Bracelet with Purple Crystal Bead

Amethyst Bracelet - Aerial View

I made a simple yet elegant pair of earrings to match the bracelet. It also uses amethyst chips on silver ear hooks. The drop measures about 1 1/4 inches.

Amethyst Dangle Earrings

Amethyst Bracelet with Amethyst Dangle Earrings


I hope to be using more gem stones in my work. I just love them, and they can be used with almost any kind of media. Which gemstones are your favorite?

Enjoy! 
-meowser

Black, Silver and Crystal Modern Celtic Bracelet

Happy Monday! (Those two words don't belong in the same sentence.)

I took the weekend as an opportunity to flex some of my Soft flex (get it, hehehe; ugh, anyway...)

After breaking several crimp beads with my gorilla hands, I managed to create this black and silver celtic bracelet. The color scheme is reminiscent of a modern office building: the transparent gray rondelle crystals, sleek black beads and silver spacers, finished with a small silver toggle and clasp. From the center hangs a much beloved silver celtic knot. The bracelet measures approximately 7 and 1/4 inches including the toggle and clasp.


Black, Silver and Crystal Modern Celtic Bracelet

Black, Silver and Crystal Modern Celtic Bracelet - Front View

Black, Silver and Crystal Modern Celtic Bracelet - Arial View

Black, Silver and Crystal Modern Celtic Bracelet - Celtic Focal


I'm quite happy with how this turned out. I forgot how versatile soft flex can be!

Enjoy! 

-meowser

Monday, October 28, 2013

Wire Work Shapes - Playing with Wire, Hammer and Anvil

Hey there!

I made some wire things a few months ago, and now realize that I am all out of "practice" wire. It's so easy to "waste" wire, isn't it? If you know where to get a budget friendly stock pile of good wire, let me know in the comments.

Anywho, while experimenting with some ideas, I came up with the following designs. They are made with 16 gauge craft wire, and the antique bronze is 26 gauge craft wire. They have also been hammered on my anvil, making them flatter and strengthening the wire.


A Bow. Want to create little arrows as well  :)

Wire Bow


Leaves Frames (maybe for earrings?). They are obviously not twins, more like sisters  ;)

Wire leaves frames


Chubby hearts. Should these be earrings? Not sure what to do with them...

Chubby wire hearts


Scepter, or Staff. Lots of stuff going on here. There's coiled wire, beads, wrapping, and hammered curls on the bottom.  I imagined a mage would use it to cast some spells.

Wire scepter or staff

Wire scepter or staff - full length view


Crescent moon. I added spirals in the center of this pendant.

Wire wrap crescent moon


Wire has so much potential! I can't wait to make some more intricate things with wire weaving, wrapping, etc. 

Enjoy! 

-meowser

Monday, September 30, 2013

Herringbone Weave Cuff with Brick Stitch Earrings

Finally, a use for those hex cut beads! I didn't realize that hex beads made the herringbone stitch stick out so well. I created a cuff using black hex cut beads, and it looks as though it's shimmering as the light dances off the multifaceted beads.  I have to say, I am so proud of this piece  

I also made my first brick stitch component, and did a brick stitch around a bead. I used one as a sort of closure for the cuff, and I decided to make more components for the earrings. No pattern followed here, just regular brick stitch and herringbone.


 I really wanted to make the earrings using a herringbone stitch, but since I wanted to increase/decrease the rows, I found that I needed to use brick stitch. So, the center of my earrings has 3 rows of herringbone stitch, and the rest tapers off each end using brick stitch, follow by the little component.


Here's the set, although the bracelet had a hard time standing up.


Just laid on a glass jar, to show the components.


I would love to get some feedback on these. I'm actually working on the choker for it right now. I'm thinking of putting a larger component in the center, and maybe have some picots or fringes on the front. I need to buy some ribbon ends/clamps, or whatever those things are called that are used on cuffs and chokers. 

Anyway, are these sellable (yes, I just made up that word)? Would you buy them? 

Ciao for now.

-meowser 

Wednesday, September 25, 2013

Brick Stitch Beaded Ring with Tutorial and Links

A beading we will go!

I found this fairly easy tutorial on about.com for making a cute beaded ring at http://beadwork.about.com/library/weekly/aa110298.htm

This also uses a video by beadaholique:
http://www.youtube.com/watch?v=EsZADmxvH24

Beaded ring with a blue center bead

It took  me a few hours, but more experienced beaders should be able to do these in 1-2-3. Anyway, you need to know brick stitch, which, when you watch a good video, is not really that hard. The most difficult part for me was doing the increase in rows. I'm linking to the tutorial here from beadaholique, but will also try explaining in my own way how to make the ring.

Tutorial (Sort of)


First, create the band:

Do a brick stitch base row; to do this, pick up 2 beads and tie them in a knot, leaving a 6 inch tail (I'm really bad at knots, so I did it as if I was going to tie shoelaces, but put the string under a second time, then pulled. I thought I would mess it up, but I pulled tight and forced the beads to sit side by side, then held them firmly with my fingers).
Now, go back down the second bead (if your string is coming out from the top, then go down the bead next to it, then back up the bead next to it. Make sure you pull tight. The beads must be sitting next to each other. If you're having a problem with them, see if you may have went up/down the beads the wrong way (I just pull out the thread, go the other direction and see if the beads won't fight me). Moving along...

Take 2 more beads, and go down the bead next to you (where the "working thread" is coming out of. This is the thread you are using, not the tail end). Go back up both beads next to the one where the working thread is exiting from.

Repeat this process until the ring is about 3/4 length around your finger. Remember, pick up 2 beads, go down the upper most bead next to you, and up both beads next to that one.
When you reach the length, you need to do an increase brick stitch. Here's where the video tutorial was pivotal for me. The next row will have 3 beads, then 4, then 5. To do the next row, pick up 2 beads, but instead of going down the bead next to it, you go under the string/loop between the beads and then up and through the bead closest to you. Follow the video here to do the increases, first 3 beads, then 4, then 5 beads.

When you're done, you need to add the outer edges of the ring. After doing an increase, you will do the same stitch you did for the band, but only for 5 rows, as per the about.com tutorial. Weave back down and do the other side in the same way.

You can now choose your bead. From here the tutorial is pretty straightforward I think; thread the focal bead through the middle bead of the row which has 5 beads. The rest is just weaving through the top and bottom, connecting both sides, and going through the band to reinforce it.

There are a lot of possibilities using this pattern. I was surprisingly happy with my result.

Itty bitty ring


Enjoy!
-meowser 

Right Angle Weave Gray Pearl Set

Viola! My very first beaded set!

I created a ring and earrings off the same pattern (or tried to).

A note about the pattern: when you go over the ring again with the seed beads, it tightens up the ring and makes it smaller, so give yourself more length to work with (my ring only fits my pinky finger).


For the earrings, I made a larger unit on the bottom and tapered it towards the top. I went back down, trying to follow the "V" pattern, and weaved back up and created a loop to hold the earring wires. The "V" shape shifted a bit in the pictures.

I know it's no where near professional quality, but I was happy that I managed to finish my first set!

Feedback? Thoughts?

-meowser 


Right Angle Weave Silver Pearl Bracelet

Finally! Another completed beaded project by the non-beading bead weaver (try saying that 3 times fast).

I found the following page with a few different schemes or patterns:

http://www.artbiser.com.ua/forum/viewtopic.php?f=19&t=44&p=173

I saw this particular 2 needle right angle weave pattern, and thought I'd give it a try with my 6mm gray pearls and black seed beads:

CikCak cernobily.jpg
From http://www.artbiser.com.ua/forum/viewtopic.php?f=19&t=44&p=173
Note: You can scroll down, or Ctrl+F for "Zigzag cernobily".

As you can see, I didn't follow it exactly (I got confused when adding the seed beads).


Looks more like "V"s instead of "X"s, but that's ok  


Close up of the pattern


It's actually not a very long bracelet

I really like the raised effect that the seed beads add to the bracelet.  It gives it added depth.  I added a silver toggle clasp to the bracelet. My modest goal is to make a matching set for this piece.  I'm so happy to have tried something new!

Enjoy your beading / bead weaving!

-meowser 


Friday, September 13, 2013

First Peyote Stitch Ring


It's been awhile, but finally, a new piece of jewelry! I tried my hand at peyote stitch, which I look forward to learning more of. I tried to  make a pattern by eye, so it looks a bit funky, but whatever; it was more about practicing the stitch  

I am not using delica beads, but some kind of seed beads which are not evenly cut, so it's not as neat as it should be.

Some weird looking "V"

On the finger. The "V" doesn't look any better...


Well, that's my first peyote stitch piece. I look forward to making more soon (and not as funky looking).

Thanks for passing by!

-meowser ッ


Wednesday, July 10, 2013

How Effective is Pinterest in Helping Animals in Need? (A Poll)

Has seeing an animal in need on Pinterest made you jump to action?


Hi everyone! I've thought about it a few times, especially with so many pinterest boards dedicated to animals, animal adoption, animal rescue, petitions, donations, etc.  I wanted to know how effective are these boards. Has anyone ever adopted or fostered an animal that they saw on a pinterest board? Or have they sprang into action because of animal they saw or story they read on pinterest? For myself, I remember seeing some Urgent Pets on Death Row Cats in the NYC Animal Care & Control shelters. Knowing only very little of it, I started to delve into this world more, and learn more about this organization (Urgent) and how they try to help animals who are put on death row because there is no space in the shelter. Of course, the shelter states that they only euthanize pets who have a serious illness or severe behavioral issues. And there is a whole lot of discussion regarding necessary reform.  Alas, I digress...

So, has seeing any of these animals on Pinterest helped spring you to action, or have you adopted or fostered any that you initially saw on pinterest? Or do you know someone who has helped an animal because they saw it on Pinterest? I am curious to know.

The reason I would like to do this informal poll is to know the effectiveness of sharing on Pinterest vs. Facebook groups, and also to figure out where efforts should be concentrated. I'm just a person who wants to help save the lives of innocent cats  =^..^=

You can comment or answer the poll. I'll try to collect as much as I can, but given the amount of traffic my little blog gets, I doubt it will be much  :p

Thanks,
meowser

Hermione, formerly "Redz", pulled from Brooklyn AC&C with the help of a rescue group, . 

Tuesday, April 23, 2013

Beaded Things Experimentation

Ok, so I've seen a lot of cute and awesome beaded things on pinterest, like mini pumpkins, purses, cubes, flowers, and so on. These "pinspired" beaded things come from a beaded heart I saw here and the purse here.
I had some difficulty, to say the least, because of my lack of supplies; no beading thread or cord, only 28 gauge wire, and no threading needle. I couldn't help myself though, as I saw these things and I needed to try making them with what I had! Well, you can see the results.


Beaded Heart Pendant

Oh, look at all that wire

I followed the free tutorial tutorial on http://www.beadjewelrymaking.com, which wasn't too hard (and also has tons of free tutorials, by the way),  but my heart is kind of a sad one.

No, this is not American Greetings


It looks black, but it's really dark blue. You can see the antique bronze wire all over. But I like how sturdy it is! I was trying to put a loop on top (like a bail) to be used as a charm or pendant, but I couldn't do it.
Anyway, I know this is not a wonderful creation, but at least it is possible!

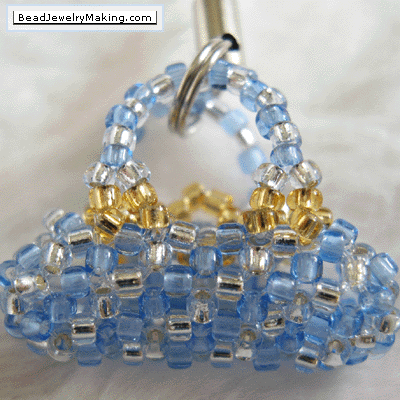
Moving on to item 2, is a purse, which looks really cute on the tutorial:

Beaded Hangbag Charm

My result, however, is quite different.


Beaded Handbag (Hand bag? Purse? Whatever)

I'm all crooked!


I also acquired a model to demonstrate this creation.

I'm not sure this complements his complexion

I tried positioning the accessory differently on this model, but I think the handbag is just an utter failure.

Yes, turn away from the camera, look casual. And strike a pose!


Alas, I think my model may have been too masculine for this handbag. At least he had fun being in the middle of all of my supplies! And I had fun making these. So, even if you're lacking in some supplies, just try something with what you have and improvise. It might look like a mess, but you'll still be learning and having fun.

Enjoy!  
-meowser
(Credits to Popeye for the modeling and photos)

Saturday, January 19, 2013

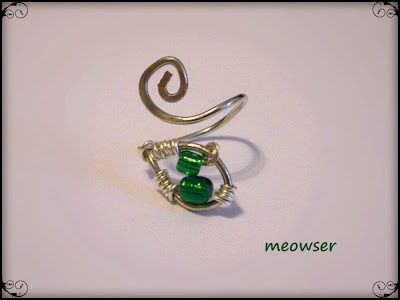
Jewelry Making - Silver Wire Wrapped Ring with Green Beads

Hello Hello!

It's been awhile since my last post, but I have made some headway in jewelry making, especially with all the pinspirations that I've seen over the last few months. I bought a steel bench block and a hammer so I could start hammering some of my wire pieces. I also obtained more wire in different gauges so I could practice the wire wrapping within the ring. And yes, there is a kitty in the background  ^^.


The ring is adjustable, and the hammered end has hardened it and helped it keep its shape.


This is just the start for me with hammering and wire wrapping.  I can't wait to try so many other wire wrapping tutorials I've seen!

-meowser